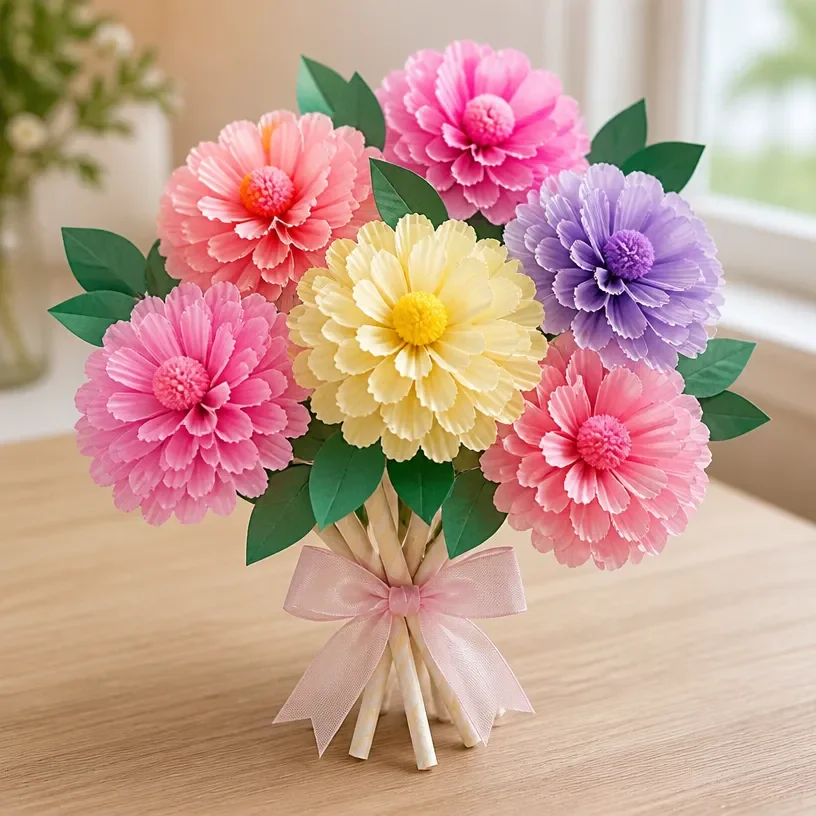
The moments when you sit down to create something floral are often filled with anticipation. Perhaps you have a colorful collection of craft supplies spread out before you, or maybe a few pressed flowers waiting to be transformed into a keepsake. It could even be the lingering thought of how to showcase those delicate blooms that inspires a burst of creativity. In this light of inspiration, the Cupcake-Liner Dahlia Bouquet presents itself as a delightful project. It blends artistic expression with the timeless beauty of flowers, allowing you to capture that fleeting nature of fresh blooms while crafting a charming arrangement that brings warmth to your space. You may also find Coffee Filter Tie Dye Flower Bouquet useful.
Why This Cupcake-Liner Dahlia Bouquet Works So Well

You may also find Pressed Wedding Bouquet Frame useful.
This Cupcake-Liner Dahlia Bouquet project is not just visually appealing; it’s also easy and accessible for makers of all experience levels. Using everyday materials, it transforms simple items into vibrant flowers that look lush and lively. The clever use of cupcake liners, for instance, adds texture and variety to the bouquet. These liners come in a range of colors, enabling you to customize the bouquet according to your taste or the season. Additionally, this project allows for a creative outlet without the need for complex floral arranging skills, making it approachable and fun.
A Quick Look Before You Begin
Creating your Cupcake-Liner Dahlia Bouquet is a straightforward process that centers around a few key steps. You will first prepare your materials and then focus on constructing the vibrant flowers that will later come together in a beautiful arrangement. Ensuring that you have a clean space will help mitigate any mess, especially when it comes to handling glue or other adhesives. Since the flower-building stages are delicate, practicing gentle handling will make the process smoother and more enjoyable.
Materials You’ll Need
- Cupcake liners: Various colors and patterns contribute to the bouquet’s visual interest.
- Scissors: Essential for cutting the liners into petal shapes.
- Glue: A strong craft glue to hold your flower pieces together.
- Floral wire: To provide structure to the bouquet and create stems.
- Green floral tape: To wrap around the wire for a finished look.
- Decorative ribbon or twine: Optional for adding a personal touch to your bouquet.
Before diving in, consider how the colors of your cupcake liners harmonize with each other. Choosing complementary colors will elevate the bouquet and make it easier to blend your creations into a cohesive design.
Step-by-Step Directions

Prepare the Cupcake Liners: Start by cutting the cupcake liners into petal shapes. You can experiment with different sizes to create a more eclectic bouquet. Aim to achieve a balance in texture and size as you cut.
Form the Flower Layers: Take several petal shapes and layer them to create depth. Use varying sizes to get an authentic flower-like appearance. Gently scrunch the base of the petals to add dimension.
Secure the Layers: Apply a small amount of glue at the base and stack the layers, allowing them to adhere firmly. This gives your flower a sturdy foundation while keeping it light and airy.
Create the Stems: Cut lengths of floral wire to your desired stem lengths. Secure the floral wire to the base of each flower with glue, holding for a few seconds to ensure it bonds well.
Wrap the Stems: Once the glue has set, wrap the floral tape tightly around the wire stems. This not only provides a finished look but also gives additional support.
Assemble the Bouquet: Begin gathering your flowers to design your bouquet. Play with spacing and arrangement, ensuring a balanced look as you place each flower alongside others.
Finalize the Design: Once satisfied with the arrangement, use decorative ribbon or twine to tie the bouquet together at the base. This gives a polished touch and makes it easier to handle.
Display Your Creation: Choose a lovely vase or a decorative holder to showcase your bouquet. Consider placing it somewhere prominent to enjoy its beauty daily.
The Design Behind This Floral DIY

The beauty of the Cupcake-Liner Dahlia Bouquet lies in its combination of color and texture. Layering different colors of cupcake liners not only creates eye-catching blossoms but also plays with light and shadow, enhancing the bouquet’s visual appeal. The randomness of the petal sizes contributes to a naturalistic look, helping the bouquet feel more organic. As you layer your petals, think about how flower arrangements in nature often combine various spaces and sizes to create balance.
Troubleshooting Common Issues
Creating a floral arrangement may come with its challenges. If you find that your flowers look sparse, consider adding more layers or using smaller petals to fill in gaps. It’s normal for some flowers to shift during assembly; using small amounts of glue strategically can help mitigate this. If adhesive becomes visible on your flowers, try to manage the amount you apply or use decorative elements to cover any mishaps.
Easy Variations to Try
To make the Cupcake-Liner Dahlia Bouquet your own, consider these easy variations:
- Use patterned liners for a playful twist.
- Combine with other crafted flowers like the ones you can create using fork pom-pom techniques for more color and textures.
- Adjust the size of your bouquet depending on your display space.
- Experiment with different backgrounds, such as colored containers or wrapping the stems in different textures.
Displaying or Keeping Your Project
Once your Cupcake-Liner Dahlia Bouquet is complete, it’s time to think about display options. A clean vase can elevate the entire arrangement. However, if you’re gifting it, consider using decorative cellophane to create a wrapped presentation that shows off the vibrant blooms. Ensure to place the bouquet in a cool, dry area to preserve its colors for as long as possible, and handle it gently to avoid crush the delicate petals.
FAQs About Cupcake-Liner Dahlia Bouquet
What if I don’t have cupcake liners in the colors I want?
You can always use plain white liners and decorate them with markers or paints before cutting and assembling them.
Can I substitute floral wire with something else?
While floral wire is ideal for structure, you could use sturdy straws as an alternative if they provide sufficient support for your flowers.
How do I clean up after making this project?
Crafting can be messy, but have a damp cloth or paper towel handy to wipe your work surface. Removing any glue residue promptly will keep your space clean.
Do I need special tools for this project?
The tools required are basic scissors and glue are sufficient. If you like, you can use additional items like a bone folder for petal shaping, but they are not necessary.
A Final Helpful Note
Creating the Cupcake-Liner Dahlia Bouquet is a wonderful way to explore floral crafting without feeling pressured by perfection. Relax into the process, embrace your creativity, and remember that the beauty lies in your unique touch. Enjoy each step and let the vibrant colors inspire you as you craft your very own floral arrangement.
Conclusion
If you're looking to add some delicious flair to your floral creations, exploring cupcake-themed treats can enhance your experience. You might enjoy trying out
Colored Sugar and Dahlia Cupcakesfor an exciting twist on dessert. Additionally, if you're interested in incorporating dahlia designs into other projects, check out the
Orange and Purple Dahlia Cupcakeswhich may inspire further crafting ideas.
Follow us on social for more floral DIY projects & botanical inspiration!
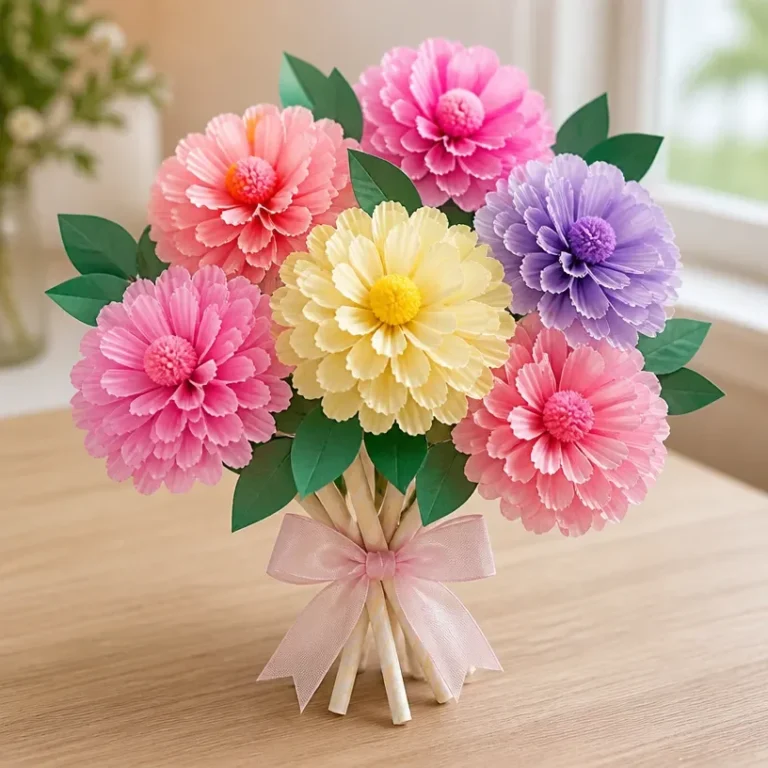
Cupcake-Liner Dahlia Bouquet
Would you like to save this recipe?
By submitting you agree to receive this recipe and occasional emails. Unsubscribe anytime.
Ingredients
Materials Needed
- various colors Cupcake liners Different colors and patterns to create visual interest.
- 1 piece Scissors For cutting liners into petal shapes.
- 1 bottle Glue Strong craft glue to hold flower pieces together.
- 1 roll Floral wire To provide structure for the bouquet.
- 1 roll Green floral tape To wrap around the wire for a finished look.
- optional Decorative ribbon or twine To add a personal touch.
Instructions
Flower Creation
- Prepare the Cupcake Liners by cutting them into petal shapes, experimenting with different sizes for variety.
- Form the Flower Layers by layering several petal shapes to create depth, scrunching the bases for dimension.
- Secure the Layers with a small amount of glue at the base, stacking them to adhere firmly.
- Create the Stems by cutting lengths of floral wire to your desired stem size and gluing them to the base.
- Wrap the Stems with floral tape for a finished look and added support.
- Assemble the Bouquet by gathering the flowers and arranging them for a balanced look.
- Finalize the Design using decorative ribbon or twine to tie the bouquet at the base.
- Display Your Creation in a lovely vase or decorative holder.
Last Step: Don’t forget to leave a rating and comment below! It helps other readers find the best recipes — and it helps us too!
Tips & Notes:
Nutrition Information: Serving: 1 | Calories: | Carbohydrates: | Protein: | Fat: | Sodium: | Fiber: | Sugar:
Nutritional information is provided as a courtesy and calculated automatically. Values can vary depending on the brands and ingredients you use, so if you’re tracking closely, I recommend calculating with your own preferred tool.