
Just like many crafters, you may find yourself setting out a few craft supplies for an afternoon project to create something that brings a touch of flowers indoors. One delightful project that you can take on is making a Rolled Paper Rose Bouquet. This craft merges creativity and practicality, allowing you to transform simple colored paper or cardstock into beautiful representations of your favorite blooms. You may also find Rolled Paper Rose Bouquet Tutorial useful.
Why You’ll Love Making Rolled Paper Rose Bouquet

You may also find Rolled Denim Rose Bouquet Tutorial useful.
Creating a Rolled Paper Rose Bouquet is an approachable project for both beginners and seasoned floral crafters alike. Not only do these paper roses look charming, but they are also manageable with the materials you’ll gather. With paper and a few simple tools, you can craft stunning blossoms that can brighten any space. The best part? You can personalize them to match your decor or the occasion, making them a great gift for birthdays or special celebrations.
A Quick Look Before You Begin
When you’re ready to dive into making your bouquet, take a moment to visualize the crafting process. Gather all your supplies together to streamline your workflow. This project consists of a few main stages: cutting, rolling, and assembling. The mess level is quite low, mostly involving scrap paper, which means clean-up is easy. Overall, the steps are comforting rather than overwhelming, allowing you to focus on your creative expression.
Materials You’ll Need
- Colored paper or cardstock (Choose various colors for a vibrant bouquet)
- Scissors (Make sure they are sharp for clean cuts)
- Glue stick or hot glue (Use what you’re comfortable with)
- Wire stems or skewers (These act as the backbone of your roses)
- Green tape or floral tape (For a realistic wrap on the stem)
- Optional: decorative ribbon or embellishments (To add that extra flair)
These materials provide the foundation for your beautiful bouquet. It’s helpful to select textured paper, as it adds depth to your roses. Remember to handle the paper delicately, especially during cutting and rolling.
Step-by-Step Directions

- Cut the colored paper or cardstock into circles of varying sizes. A range of sizes creates a more dynamic bouquet.
- Starting from the outer edge of the circle, cut it into a spiral, keeping the center intact. This spiral will serve as the petals of your rose.
- Begin rolling the spiral tightly towards the center to form a rose shape. Ensure you are rolling evenly for a balanced look.
- Secure the base of the rose with glue. A little goes a long way, so apply just enough to hold it together.
- Attach the wire stem or skewer to the base of the rose with tape or glue. This will give your rose the necessary structure to stand.
- Wrap the stem with green tape for a more realistic look. This finishing touch enhances the overall appearance of your flower.
- Arrange the rolled paper roses in a bouquet and add decorative ribbon if desired. Play with the spacing of your flowers to find an arrangement that feels balanced.
The Design Behind This Floral DIY

Color is an essential aspect of your Rolled Paper Rose Bouquet. Choosing a harmonious color scheme can greatly influence the bouquet’s overall appeal. Consider using color relationships like complementary colors or varying shades of the same hue to create depth. The arrangement of your flowers should have a balance, with larger roses intermixed with smaller ones. This layering adds interest to your display, making it visually captivating.
Troubleshooting Common Issues
If, as you craft, you encounter some bumps along the way, don’t worry! Here are a few common issues and their solutions:
- Uneven Petal Placement: If your petals look uneven, give them a gentle reshaping by adjusting their angles or positions.
- Shifting Flowers: To keep your flowers stable, ensure the adhesive used at the base is strong. If needed, reinforce with additional glue.
- Visible Adhesive: If the glue isn’t hidden well, try strategically placing embellishments or arranging the flowers in a way that showcases the best parts of your design.
Easy Variations to Try
To personalize your Rolled Paper Rose Bouquet, you can experiment with:
- Using seasonal colors, such as pastels for spring or warm tones for autumn.
- Combining these roses with other types of paper flowers, like tulips, to create a mixed bouquet. Check out the folded paper tulip bouquet tutorial for ideas.
- Varying the sizes of the flowers to create a more whimsical look.
- Incorporating embellishments such as glitter or beads on the petals for a more festive appearance.
Displaying or Keeping Your Project
Once you’ve completed your Rolled Paper Rose Bouquet, consider how you’ll display it. You might want to:
- Place it in a vase as a centerpiece on your dining table.
- Gift it to a friend as a unique floral arrangement.
- Store it in a cool, dry place if you plan to use it later, ensuring it maintains its shape and color.
FAQs About Rolled Paper Rose Bouquet
What if I don’t have colored cardstock? It’s perfectly fine to use standard colored paper as a substitute. Just remember that thicker paper tends to hold its shape better.
Can I use a different adhesive? Yes! If you find hot glue tricky or too messy, a good-quality glue stick should work well for this project.
How do I achieve a natural flower shape? As you roll the spiral, make sure to adjust the tightness; looser rolls can create softer petals, while tighter rolls will give a more structured look.
A Final Helpful Note
As you embark on creating your Rolled Paper Rose Bouquet, embrace the creative process. Allow yourself to experiment with colors and shapes, and don’t stress over perfection. Each rose will add character to your bouquet, showcasing your craftsmanship and aesthetic preferences.
Conclusion
The Rolled Paper Rose Bouquet is a fantastic way to express your creativity and produce something beautiful. For less conventional inspiration, you may check the
Rolled Paper Rose Tutorial – Fun & Realistic!or learn different techniques on
How to Make DIY Rolled Paper Roses. Each has unique tips that can inspire your floral crafting journey!
Follow us on social for more floral DIY projects & botanical inspiration!
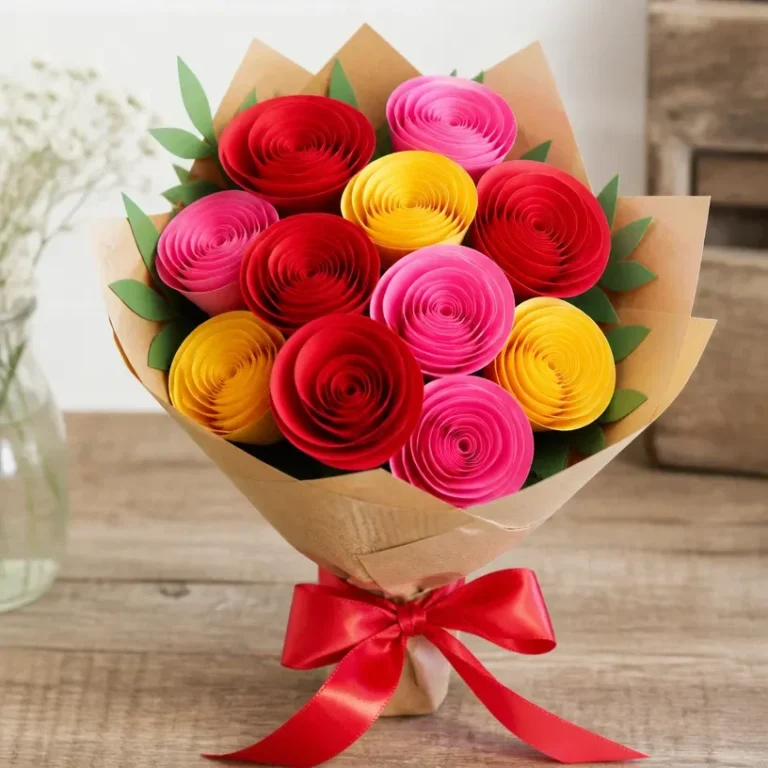
Rolled Paper Rose Bouquet
Would you like to save this recipe?
By submitting you agree to receive this recipe and occasional emails. Unsubscribe anytime.
Ingredients
Materials for Roses
- 1 piece Colored paper or cardstock Choose various colors for a vibrant bouquet.
- 1 piece Scissors Make sure they are sharp for clean cuts.
- 1 piece Glue stick or hot glue Use what you’re comfortable with.
- 1 piece Wire stems or skewers These act as the backbone of your roses.
- 1 roll Green tape or floral tape For a realistic wrap on the stem.
- optional Decorative ribbon or embellishments To add that extra flair.
Instructions
Step-by-Step Directions
- Cut the colored paper or cardstock into circles of varying sizes.
- Starting from the outer edge of the circle, cut it into a spiral, keeping the center intact.
- Begin rolling the spiral tightly towards the center to form a rose shape.
- Secure the base of the rose with glue.
- Attach the wire stem or skewer to the base of the rose with tape or glue.
- Wrap the stem with green tape for a more realistic look.
- Arrange the rolled paper roses in a bouquet and add decorative ribbon if desired.
Last Step: Don’t forget to leave a rating and comment below! It helps other readers find the best recipes — and it helps us too!
Tips & Notes:
Nutrition Information: Serving: 1 | Calories: | Carbohydrates: | Protein: | Fat: | Sodium: | Fiber: | Sugar:
Nutritional information is provided as a courtesy and calculated automatically. Values can vary depending on the brands and ingredients you use, so if you’re tracking closely, I recommend calculating with your own preferred tool.