
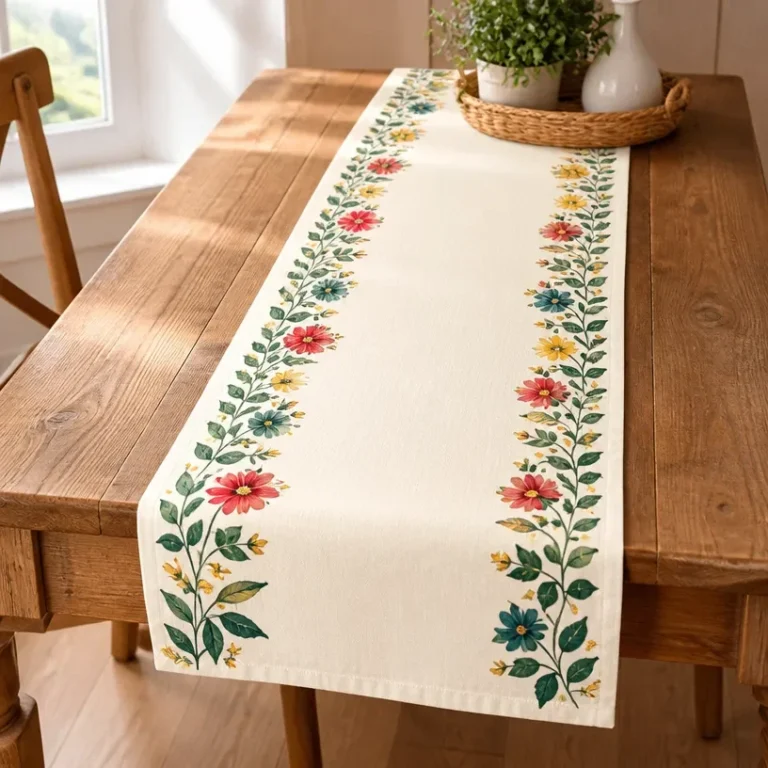
Creating a beautiful space filled with the charm of floral elements can be as simple as a weekend project. Picture yourself setting out craft supplies, from paints to stencils, along with an array of dried flowers or pressed botanical materials. This is the perfect invitation to create a stunning Botanical Stenciled Cotton Table Runner. Not only does this project add a vibrant touch to your dining space, but it also allows you to express your creativity while preserving nature’s beauty. For further inspiration, consider exploring the art of botanical wall decor with this pressed leaf art project.
Why This Botanical Stenciled Cotton Table Runner Works So Well

The appeal of the Botanical Stenciled Cotton Table Runner lies in its approachability and visual rewards. First, the materials are easy to find, making the project manageable for crafters of all skill levels. The runner can transform a simple table setting into an elegant display, inviting admiration and enhancing your home decor. Additionally, this DIY allows for creative freedom, enabling you to choose colors and patterns that best fit your personal style. By engaging with floral elements, you’ll get a delightful way to connect with nature while designing something functional and aesthetic.
A Quick Look Before You Begin
This craft smoothly combines basic techniques with artistic flair, making it an enjoyable and achievable project. Prepare your workspace with all the materials set out neatly. The main construction approach revolves around stenciling the design onto the cotton runner and incorporating dried flowers for added dimension. Expect some mess; it’s part of the creative process. When using paint, just be mindful of delicate stages where precision is necessary. By approaching the project calmly, you’ll make it an enjoyable experience.
Materials You’ll Need
- Cotton table runner: A smooth fabric provides the best surface for stenciling and preserving designs.
- Stencils: Choose floral designs that will complement your theme.
- Fabric paints: Select colors that harmonize well, ensuring they’re suitable for use on cotton.
- Dried flowers: These will add texture and beauty to the runner.
- Brushes and sponges: Useful for applying paint and texture.
- Adhesive: A strong fabric glue works best for attaching dried elements.
- Plastic covering: Keep your workspace clean by protecting surfaces from spills.
Step-by-Step Directions

- Prepare Your Workspace: Lay down a plastic cover to protect your surfaces. Ensure you have all materials within reach.
- Layout Your Runner: Place the cotton runner flat on your workspace, smoothing out any wrinkles for a clean, even canvas.
- Choose Your Stencils: Select your desired floral stencil patterns and position them on the runner. Consider spacing that feels balanced and visually appealing.
- Apply Fabric Paint: Using a brush or sponge, apply fabric paint over the stencil. Be cautious with the amount of paint to prevent bleeding underneath the stencil edges.
- Remove Stencils Carefully: Once you have applied the paint, slowly lift the stencil away from the fabric. Take care to ensure no paint smudges.
- Allow to Dry: Set the runner aside to allow the paint to dry completely. This may take a few hours, so patience is key.
- Arrange Dried Flowers: Once the paint is dry, you can thoughtfully position your dried flowers across the runner in a way that complements the stenciled design.
- Adhere the Flowers: Using a strong fabric glue, attach the dried flowers. Hold each flower in place for a moment to secure its position.
- Final Touches: After all elements are attached, allow the glue to dry fully. Consider adding a top coat of fabric sealant for extra durability.
- Display Your Creation: Once dry, set the runner on your table and enjoy your beautiful handmade floral display.
The Design Behind This Floral DIY

This design combines layers of texture and color, creating a rich visual experience. The stenciled areas serve as a backdrop, while the dried flowers provide dimension and life. When selecting colors for the fabric paint, consider the harmony between your floral elements and the table settings they will enhance. Layering flowers with various heights and shapes adds interest to your design, while adequate spacing between elements allows each to breathe, preventing the arrangement from feeling crowded.
Troubleshooting Common Issues
Throughout crafting, you might encounter a few common issues. If flowers seem to move during the glue process, try using small amounts of adhesive and allowing each section to dry before continuing. If the spacing feels off after the initial application, don’t hesitate to rearrange and experiment until you find a balance that feels right for your eye. Should you notice visible adhesive, use a clear drying variety to help blend it into the background.
Easy Variations to Try
To make this project distinctly yours, consider these easy variations:
- Color Changes: Alter the paint colors based on seasonal themes, such as autumn hues or spring pastels.
- Different Botanicals: Mix a variety of dried flowers, grains, or even leaves to add diversity to the texture.
- Pattern Play: Use different stencil patterns for a unique combination across multiple runners.
- Size Adjustments: Scale the runner to fit small tables or larger banquet settings just adjust the material size accordingly.
- Gift Arrangements: Wrap completed runners creatively with natural twine or floral ribbon for a personalized gift presentation.
Displaying or Keeping Your Project
For showcasing your new Botanical Stenciled Cotton Table Runner, consider placing it on a dining or coffee table where it can be appreciated by guests. If you’re storing it, keep it flat and covered to avoid dust. If you’ve used delicate flowers, handle the runner with care, ensuring it’s not crushed or damaged when moving it. Reuse leftover materials creatively, perhaps in other DIY floral projects, to minimize waste.
FAQs About Botanical Stenciled Cotton Table Runner
What if I don’t have fabric paint?
You can use acrylic paint as an alternative, but be sure to seal the finished runner with a compatible fabric medium to ensure durability.
Can I substitute dried flowers with fresh ones?
While fresh flowers can look beautiful, they might not hold up over time. Dried flowers are recommended for their longevity and ease of use.
How do I prevent the paint from bleeding?
A light application with a dabbing technique works best. Avoid over-saturating your brush with paint, and use a stencil brush for more control.
Can I wash the runner after it’s complete?
To preserve your creation, hand wash it gently in cold water without harsh detergents. Lay it flat to dry to maintain its shape.
What types of flowers work best for this project?
Dried flowers like lavender, statice, or even pressed leaves work wonderfully as they add delightful textures and colors without wilting.
A Final Helpful Note
Creating a Botanical Stenciled Cotton Table Runner is a joyful experience filled with possibilities. As you craft, remember to trust your instincts and feel free to express your creativity. You have the power to transform simple materials into a cherished piece for your home. Embrace the journey, and enjoy every moment of bringing your floral vision to life.
Conclusion
The Botanical Stenciled Cotton Table Runner is a wonderful addition to your crafting repertoire. Once you’ve mastered the basics with your table runner, consider further exploring flower crafting through projects such as this Botanical Stencil Set for Indigo Paste-Resist Dyeing or enhancing your décor with unique items found at Cotton Table Linens, Napkins, Placemats & Runners | Siren Song. Enjoy crafting!
Follow us on social for more floral DIY projects & botanical inspiration!
Botanical Stenciled Cotton Table Runner
Would you like to save this project?
By submitting you agree to receive this project and occasional emails. Unsubscribe anytime.
Materials
Materials Needed
- 1 piece Cotton table runner A smooth fabric provides the best surface for stenciling.
- 1 set Stencils Choose floral designs that will complement your theme.
- 3 colors Fabric paints Select colors that harmonize well with the runner.
- 1 set Dried flowers These will add texture and beauty to the runner.
- 1 set Brushes and sponges Useful for applying paint and texture.
- 1 bottle Adhesive A strong fabric glue works best for attaching dried elements.
- 1 piece Plastic covering To protect your workspace from spills.
Directions
Preparation
- Lay down a plastic cover to protect your surfaces and ensure all materials are within reach.
- Place the cotton runner flat on your workspace, smoothing out any wrinkles.
Stenciling
- Select your desired floral stencil patterns and position them on the runner.
- Apply fabric paint over the stencil using a brush or sponge.
- Carefully lift the stencil away once paint is applied to avoid smudging.
- Allow the runner to dry completely, which may take a few hours.
Final Assembly
- Once dry, position your dried flowers on the runner.
- Use fabric glue to adhere the dried flowers, holding each in place briefly.
- Allow the glue to dry fully and consider adding a top coat of fabric sealant for durability.
Display
- Set the runner on your table for all to admire.
Last Step: Don’t forget to leave a rating and comment below! It helps other readers find the best DIY projects — and it helps us too!